Today, I want to talk about WordPress a content management service (CMS). CMS is an application used to manage and publish web content in a really simple user-friendly way. It allows marketers, content creators, and merchandisers to interact with the website without having to use the IT department. In a world where content is everything the ability to quickly make changes on a website is invaluable. It’s a quick way to get a site up with the basics. There are of course multiple layers to CMS, and if you’re in the business of web developing it’s undoubtedly something you will come across.
But what I really want to talk about is how to set up your raspberry pi as a WordPress server so if you’re interested in learning you can get some hands-on experience. Check out this site with great information on CMS to learn a little more.
We’ll be setting up WP on top of our LAMP server. If you don’t have a LAMP server already check out my article here… and then come back.
…So as you already know our apache server houses our websites at /var/www/html and it’s in that folder we want to keep our WP folder. So head over there, and download the WP zip file by typing the command:
wget https://wordpress.org/latest.tar.gz
You can ls in your terminal, and see the zip file downloaded. To unzip type:
tar -xzvf latest.tar.gz
Now when you should see a new directory named WordPress. Just cd (change directory) into there, and you’ll see all the installation files. We’ll jump more into that in a moment, but first, we want to set up our database. We’re running MySQL, or since this is the raspbian version MariaDB. Either way, you can type in the command MySQL to configure the database. To create our database we’ll use the create command, and it’s here we’ll also create the database name.
create database new_database_name_here default character set utf8 collate utf8_unicode_ci;
Next let’s set up the user name, password, and grant permission status to everything. Here’s how that’ll look.
grant all on database_name.* to 'database_user'@'localhost' identified by 'user_password';
After that just type the command: ‘flush privileges;’ and ‘exit’ to leave MySQL.
Back to our folder with the installation files, we’ll want to edit our configuration file and point them to our database. In the folder, you will see a wp-config-sample.php file. It’s a nice template they provided for us, but we want our own so go ahead and copy it renaming it wp-config.php.
cp wp-config-sample.php wp-config.php
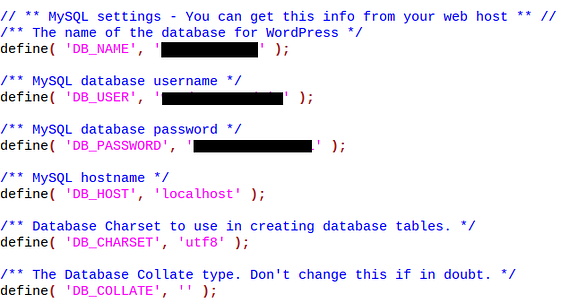
From here grab your favorite file editor, (unless you’re using nano -you animal) and locate the MySQL settings.

Fill in the information we had set up earlier, DB, name, and password.
If you scroll further down you’ll see a defined section filled with put your unique phrase here. You can generate your own keys by going to the website: https://api.wordpress.org/secret-key/1.1/salt/. Copy it and replace what’s in the file. That’s all the changes we’ll need.
So our WP site is up, but apache doesn’t know that. So let’s tell apache over at /etc/apache2/sites-available where you’ll find the 000-default.conf file. On the DocumentRoot line it shows: /var/www/html/ -add WordPress to the end of that.

Restart our apache server so the changes take effect:
service apache2 restart
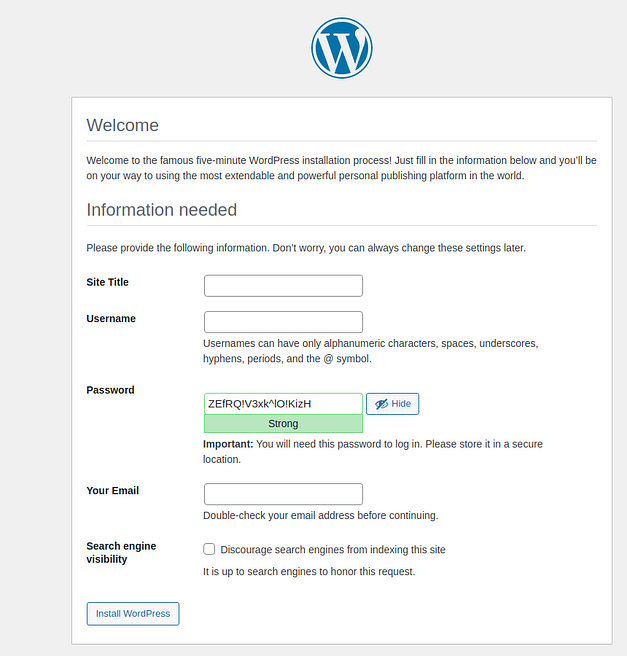
Now head to the browser and enter <ipaddr>/wp-admin/install.php and you’ll see your site login page.

Sign up, log in, and congrats!
