React redux is a powerful tool for managing information in a large app. I imagine you are already familiar with react, and its method of passing down props through components. However, when you have a large app with a maze of components it can become a hassle to pass down all of that information and to keep track of it. Redux introduces its own high bar of entry (it’s admittedly difficult for new learners), but greatly simplifies the process of managing states, and information once you clear its hurdles.
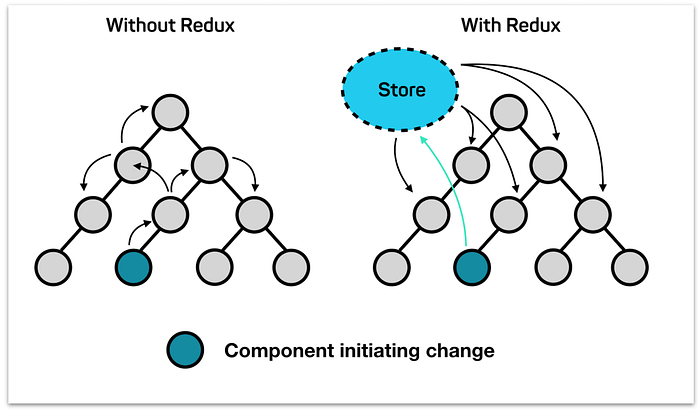
Take a moment to study the model above. The without redux model is jumping around from one component to another. Information can only be passed downwards this way, and not sideways nor up. With redux you create a store object that manages your information to disseminate information. Seems fairly simple, but the set up can be a bit complex, and in typical programming fashion the jargon is confusing. I’m going to do my best to break it down, so follow me coders. We’re about to redux the state of stress in your life.
Just kidding I’m going to increase it, and then hopefully you’ll have the appropriate epiphanies. The typically programmer coding life cycle.
After installing the necessary packages to your app (npm install redux react-redux) we’ll want to create the store. The store being where the information is held at. It’s a globalized state. In our index file I’ll import the createStore function to get started.

Next we need to set up the store/state. To keep things clean I’ll create a folder named “reducers”, and a file “gamesReducer” since this is a gaming app. Reducers are basically a function that filters out the actions. There can be multiple actions we want to perform on our state, and the reducer set’s those rules. It takes in two parameters the initial state of our store, and the actions that can be performed on them. Here’s mine.
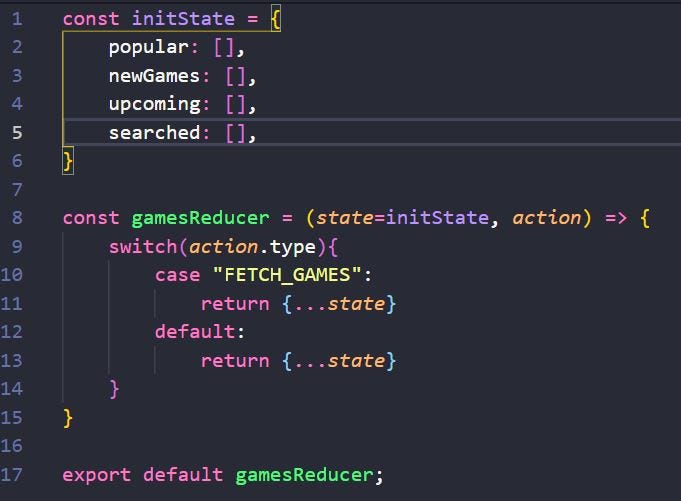
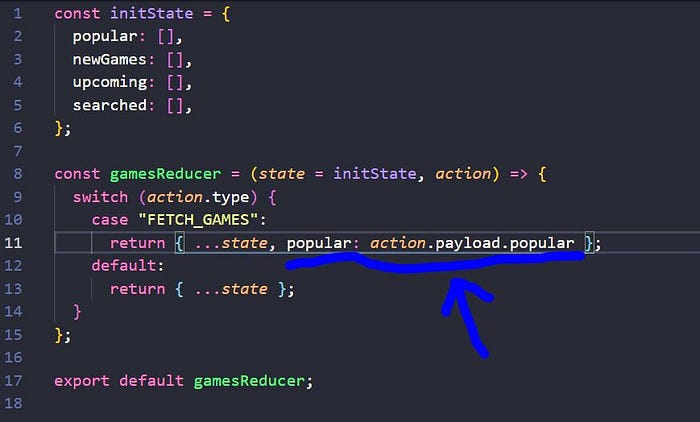
You can see I set the initState with empty arrays for now, but the function is basically a switch statement for what to do when cued by certain actions. Don’t worry we’ll set up the actions in a bit, but for now I just put in “FETCH_GAMES”, and a default that simply returns all of the state with a spread … operator.
Now, here’s a thing to know: our store function we created above will only take ONE reducer as a parameter. What if I wanted a reducer for login functionality? For that I’ll have to combine my reducers into one, and redux has a combineReducers function. So it’s always good practice to set that up in it’s own file in your reducer folder. I’ll name it index.js.
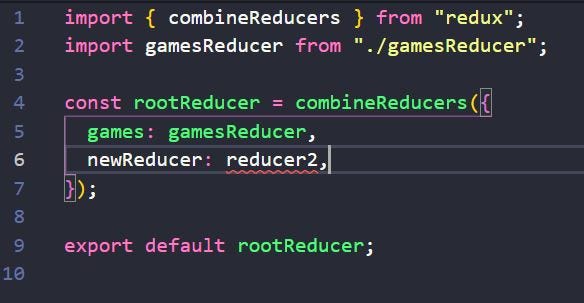
You can see my combined reducers above. I added newReducer as an example just to show that you can keep adding to this reducer. I named it rootReducer, and it will be that which I pass into the store parameter.
I’ll just import rootReducer and pass it it. With our store set up, how do we actually connect the store into the app? We’ll wrap our app with the Provider function from ‘react-redux’, and pass the store in as a parameter.
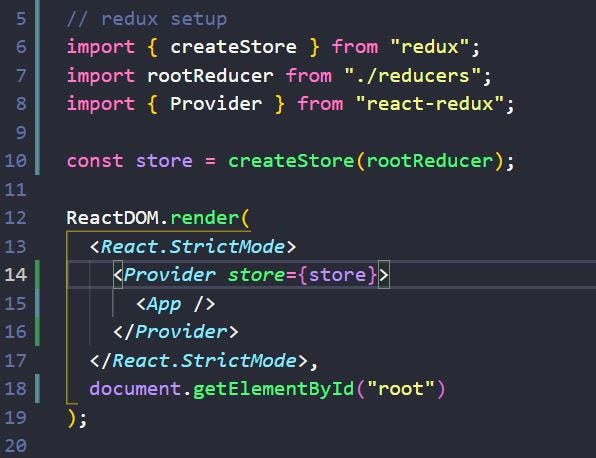
Now the store is actually in the app!
There is a second parameter we can add to our createStore function, and that is the redux dev tool. It’s a great functionality to clearly see the state of our store, and where information is passed. It deserves it’s own article, but add “window.__REDUX_DEVTOOLS_EXTENSION__()” as the second parameter, and play around with it.
Alright go grab a beer and cigarette. We’ve covered a lot. Come back, and we’ll get to the next part…

Let’s move on to the second part that’ll involve action creators, and dispatches.
Actions aren’t what you think they are. The clever folks at Facebook weren’t going to make it that easy. Actions are just an object with a description of the kind of action we want to perform. It does no action-ing. It’s the Nic Cage of action stars… a bit confusing (no disrespect to Cage). Remember the “FETCH_GAMES” action I made above. It was just a choice among the switches.
If you want instead of setting up your action as an object you can use a function that’ll return the action. These are known as action creators. They’re useful because these functions can have parameters to add more information on top of the action.
Something we have to add manually (or you could just copy pasta from the gitHub) is asynchronous functionality to our redux. Why this wasn’t built in is beyond me, but I shan’t complain. It is free after all.
We have to add ‘thunk’ from ‘redux-thunk’ and put it as a parameter into our createStore function. However we can’t add a third parameter so we’ll need to use applyMiddleware, and compose functions from ‘redux’ to make that happen.

Okay let’s create the actions in a separation actions folder. Remember our actions are the description of what we’ll want done. Since this is a gaming app I’ll want it to open up with right away with the most popular games. My API is already set up from my last article.
Using axios I’ll create a special function to export function loadsGames. Since I’m using thunk my function is within a function:
export const loadGames = () = () => {…}
Nic Cage meta.
We’re gonna want to wait however for our data to be retrieved from the API. That’s what the dispatch is going to ask to be done, so we’ll add an async to it. We’ll use axios to handle the XMLHttpRequest, and once we have that data we’ll fire a dispatch to populate our reducer, and it’s initState popular array.
Whew!
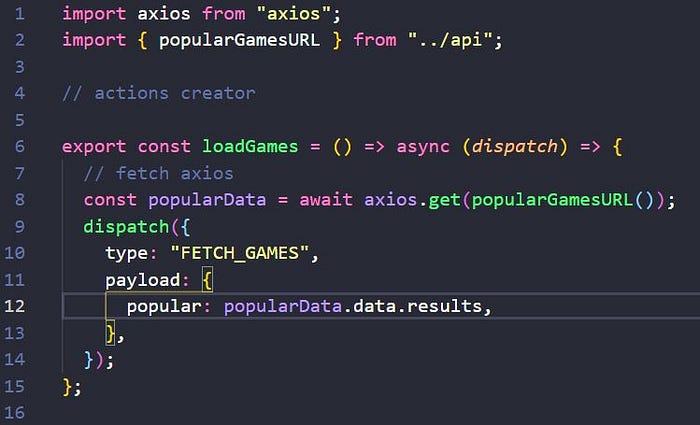
Notice that to fill the the initState I inserted it as a payload. Let me add this payload to the reducer so that when “FETCH_GAMES” is fired it will accept it.
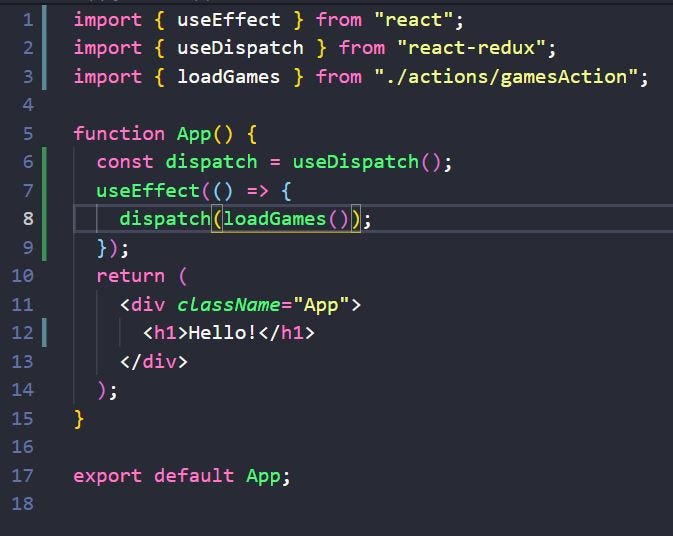
Okay, let me see if this works. For now I’ll use it in the App.js file. I’ll use useEffect to dispatch the action loadGames once the app opens.
So let me see using the dev tool if my popular array is populated with the most popular games in the last year…
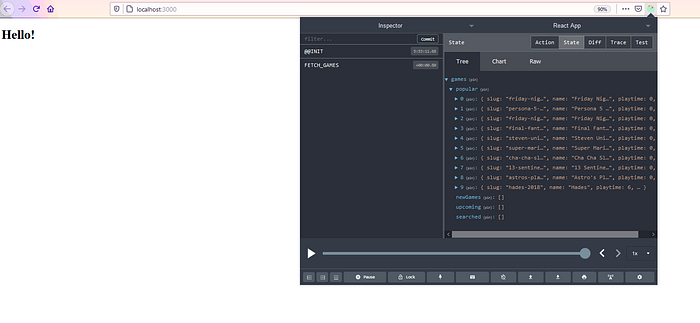
Bravo, it works! Now I can do the same thing again to fill in the other arrays in the initState object.
Redux is a complicated tool the first odd number of times you look at it, but it’s very much worth learning once you start working on large projects. I hope this helped clear the fog a bit, and encourages you to keep learning.
